
A Complete Guide To Deploying Your Web App To Amazon Web Service
This a comprehensive guide for how to containerize your Mongo-Express-React-Node (MERN) app with Docker and deploy it to Amazon Web Service (AWS) Elastic Container Service (ECS). I will share my research and lessons learned deploying a MERN app, including what worked, what didn’t work, how I prepared the app for deployment and accomplished the deployment.
Table of Contents
Prep App for Deployment
Step 1: Optimize Build
I have an isomorphic app which leverages Webpack with code splitting.
The motivation for optimizing production build is twofold: increase performance and decrease build time and size.
 XKCD: Compiling
When running the Webpack build script in production mode, the following warning messages are provided:
WARNING in asset size limit: The following asset(s) exceed the recommended size limit (244 KiB). This can impact web performance.
and
WARNING in entrypoint size limit: The following entrypoint(s) combined asset size exceeds the recommended limit (244 KiB). This can impact web performance.
This Google Web Fundamentals post discusses a few strategies for decreasing the size and build time of your production app bundles, including using url-loader, utilizing css-loader with the minimize option, making sure you use the --production flag when building your production bundles, and a few optimizations your can include in your Webpack configuration file. These optimizations provide marginal improvements. But through my other research, it became apparent that the splitChunks plugin is a necessary optimization, especially if you use a lot of big node modules like react and your app is set up with code splitting.
According to the Webpack docs, code splitting has a pitfall in which common vendor code used in all your bundles are duplicated in your bundles. This makes all your bundles big and increases overall build time. We can remove the duplicated modules with splitChunksPlugin. To use this optimization, add the following to your webpack.config.js:
// webpack.config.js
module.exports = {
  mode: // ...
  entry: // ...
  output: // ...
  optimization: {
    splitChunks: {
      cacheGroups: {
        default: false,
        vendors: false,
        vendor: {
          name: 'vendor',
          chunks: 'all',
          test: /node_modules/
        }
      }
    }
  }
}
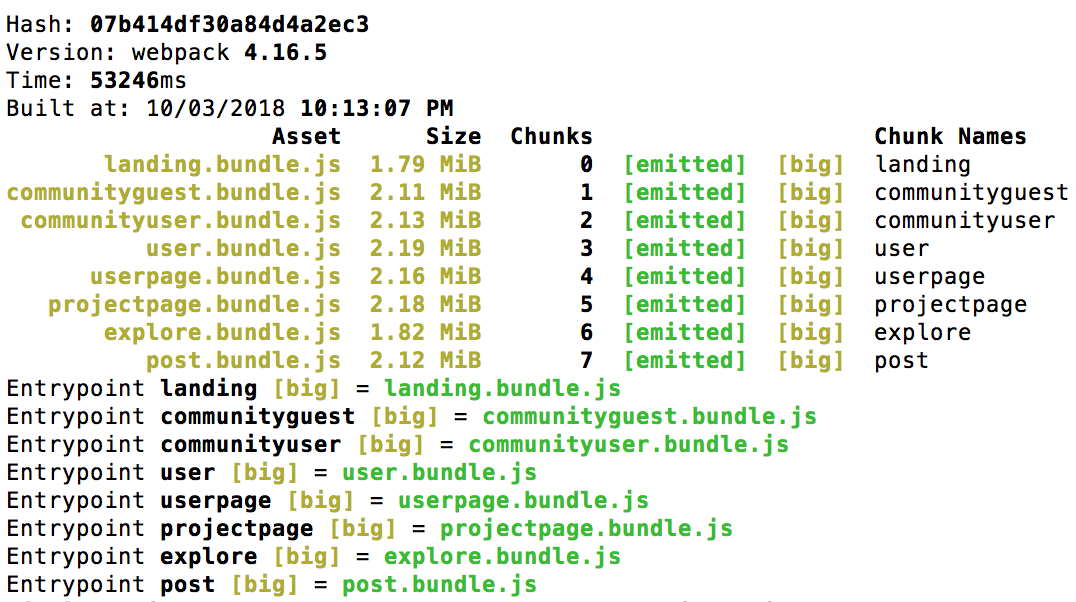 Webpack Build without optimization
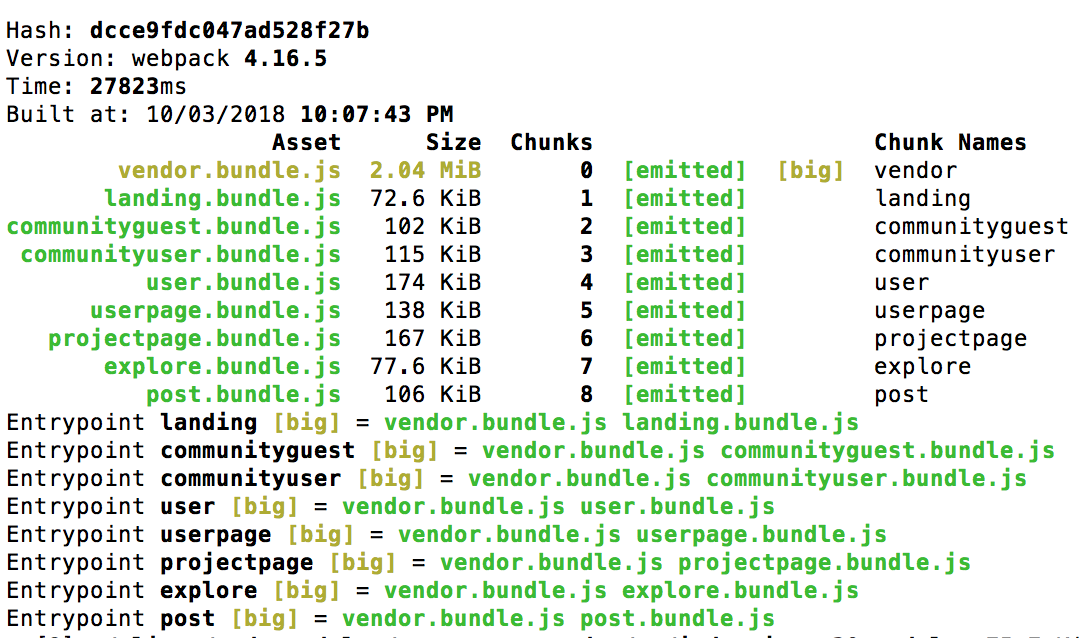 Webpack Build with optimization
Step 2: Automate scripts
I added a few npm run scripts in order to allow different ways of spinning up the servers.
// package.json
{
  "name": "looseleaf-node",
  "private": true,
  "version": "1.0.0",
  "scripts": {
    "build:prod": "./node_modules/.bin/webpack --mode production",
    "build:dev": "./node_modules/.bin/webpack --mode development",
    "prestart": "npm run build:prod",
    "start": "node server/run-prod.js",
    "start-server": "node server/run-prod.js",
    "start-server-dev": "nodemon server/run-dev.js --watch server --watch client/iso-middleware",
    "start-client": "node server/start-client.js",
    "start-dev": "concurrently \"npm run start-server-dev\" \"npm run start-client\"",
  },
  "dependencies": {
    // ...
  }
}
Since npm prestart is always executed with npm start, we want to create a separate run script for when we just want to fire up our server without rebuilding bundles. Thus, start-server was added.
Additionally, we want a version which can be used to spin up servers with nodemon and concurrently run our isomorphic app on one server (npm run start-server) and create-react-app with hot module reload and react hot loader on another server.
Note, start-client is defined in another file:
// start-client.js
const args = ["start"];
const opts = { stdio: "inherit", cwd: "client", shell: true };
require("child_process").spawn("npm", args, opts);
Step 3: Dockerize Your App
Gokce Yalcin and Jake Wright provide a great primer for Docker and ECS.
Docker is a way to manage and run containers - it is an abstraction that lets you share host resources with your application by process isolation.
The motivation for Docker is portability. Apps come with a lot of environmental configurations that would run on one computer but break on another computer which does not have the right configuration.
As this article puts it:
Modern DevOps practices demand the ability to quickly build servers and ship code to be run in different environments. Welcome to the world of containers: extremely lightweight, abstracted user space instances that can be easily launched on any compatible server and reliably provide a predictable experience.
For our MERN app, the environmental configuration is our Mongo database.
A lot of tutorials I found show you how to create container for simple apps which do not depend on other images like Mongo. The build definition provided by Dockerfile was not adequate in associating the app build with Mongo. The app ends up failing upon initial launch due to failing to bind with Mongo.
To dockerize our MERN app for running locally, we need to create two files: Dockerfile and docker-compose.yml.
Dockerfile is required if you want to use Docker to containerize your app but docker-compose is optional but useful if you want to fire up a Docker container locally to use Mongo.
Before when I run the server locally, I’d have to make sure to run mongod and mongo in the command line to fire up the Mongo daemon and Mongo shell.
But with containerization, I can create an image that includes the app and the mongodb image and driver mapping that the app depends on.
Dockerfile:
FROM node:8.11.1

# Set image metadata
LABEL version="1.0"
LABEL description="LooseLeaf Node"

# Create app directory
WORKDIR /usr/src/app

# install dependencies
COPY package*.json ./
RUN npm cache clean --force && npm install


# copy app source to image _after_ npm install so that
# application code changes don't bust the docker cache of npm install step
COPY . .

# set application PORT and expose docker PORT, 80 is what Elastic Beanstalk expects
EXPOSE 3001

CMD [ "npm", "run", "start" ]
docker-compose.yml
version: "2"
services:
  web:
    container_name: looseleaf-node-app
    build: .
    ports:
      - "3001:3001"
    depends_on:
      - mongo
  mongo:
    container_name: mongo
    image: mongo:latest
    ports:
      - "27017:27017"
    volumes:
      - data-volume:/data/db
volumes:
  data-volume:
To run both our app and Mongo in the container, we run this command:
$ docker-compose up
Deploy Docker Image to AWS ECS
The official docs from Amazon provides detailed information on how AWS ECS leverages Docker.
Amazon ECS uses Docker images in task definitions to launch containers on EC2 instances in your clusters.
Quick Primer on ECS
Amazon EC2 Container Service (Amazon ECS) is a highly-scalable, high performance container management service that supports Docker containers and allows you to run applications easily on a managed cluster of EC2 instances. The ECS service scheduler places tasks—groups of containers used for your application—onto container instances in the cluster, monitors their performance and health, and restarts failed tasks as needed. ~AWS Blog
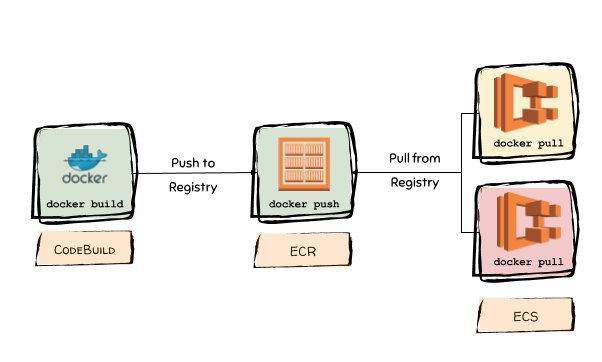
There are four parts to ECS:
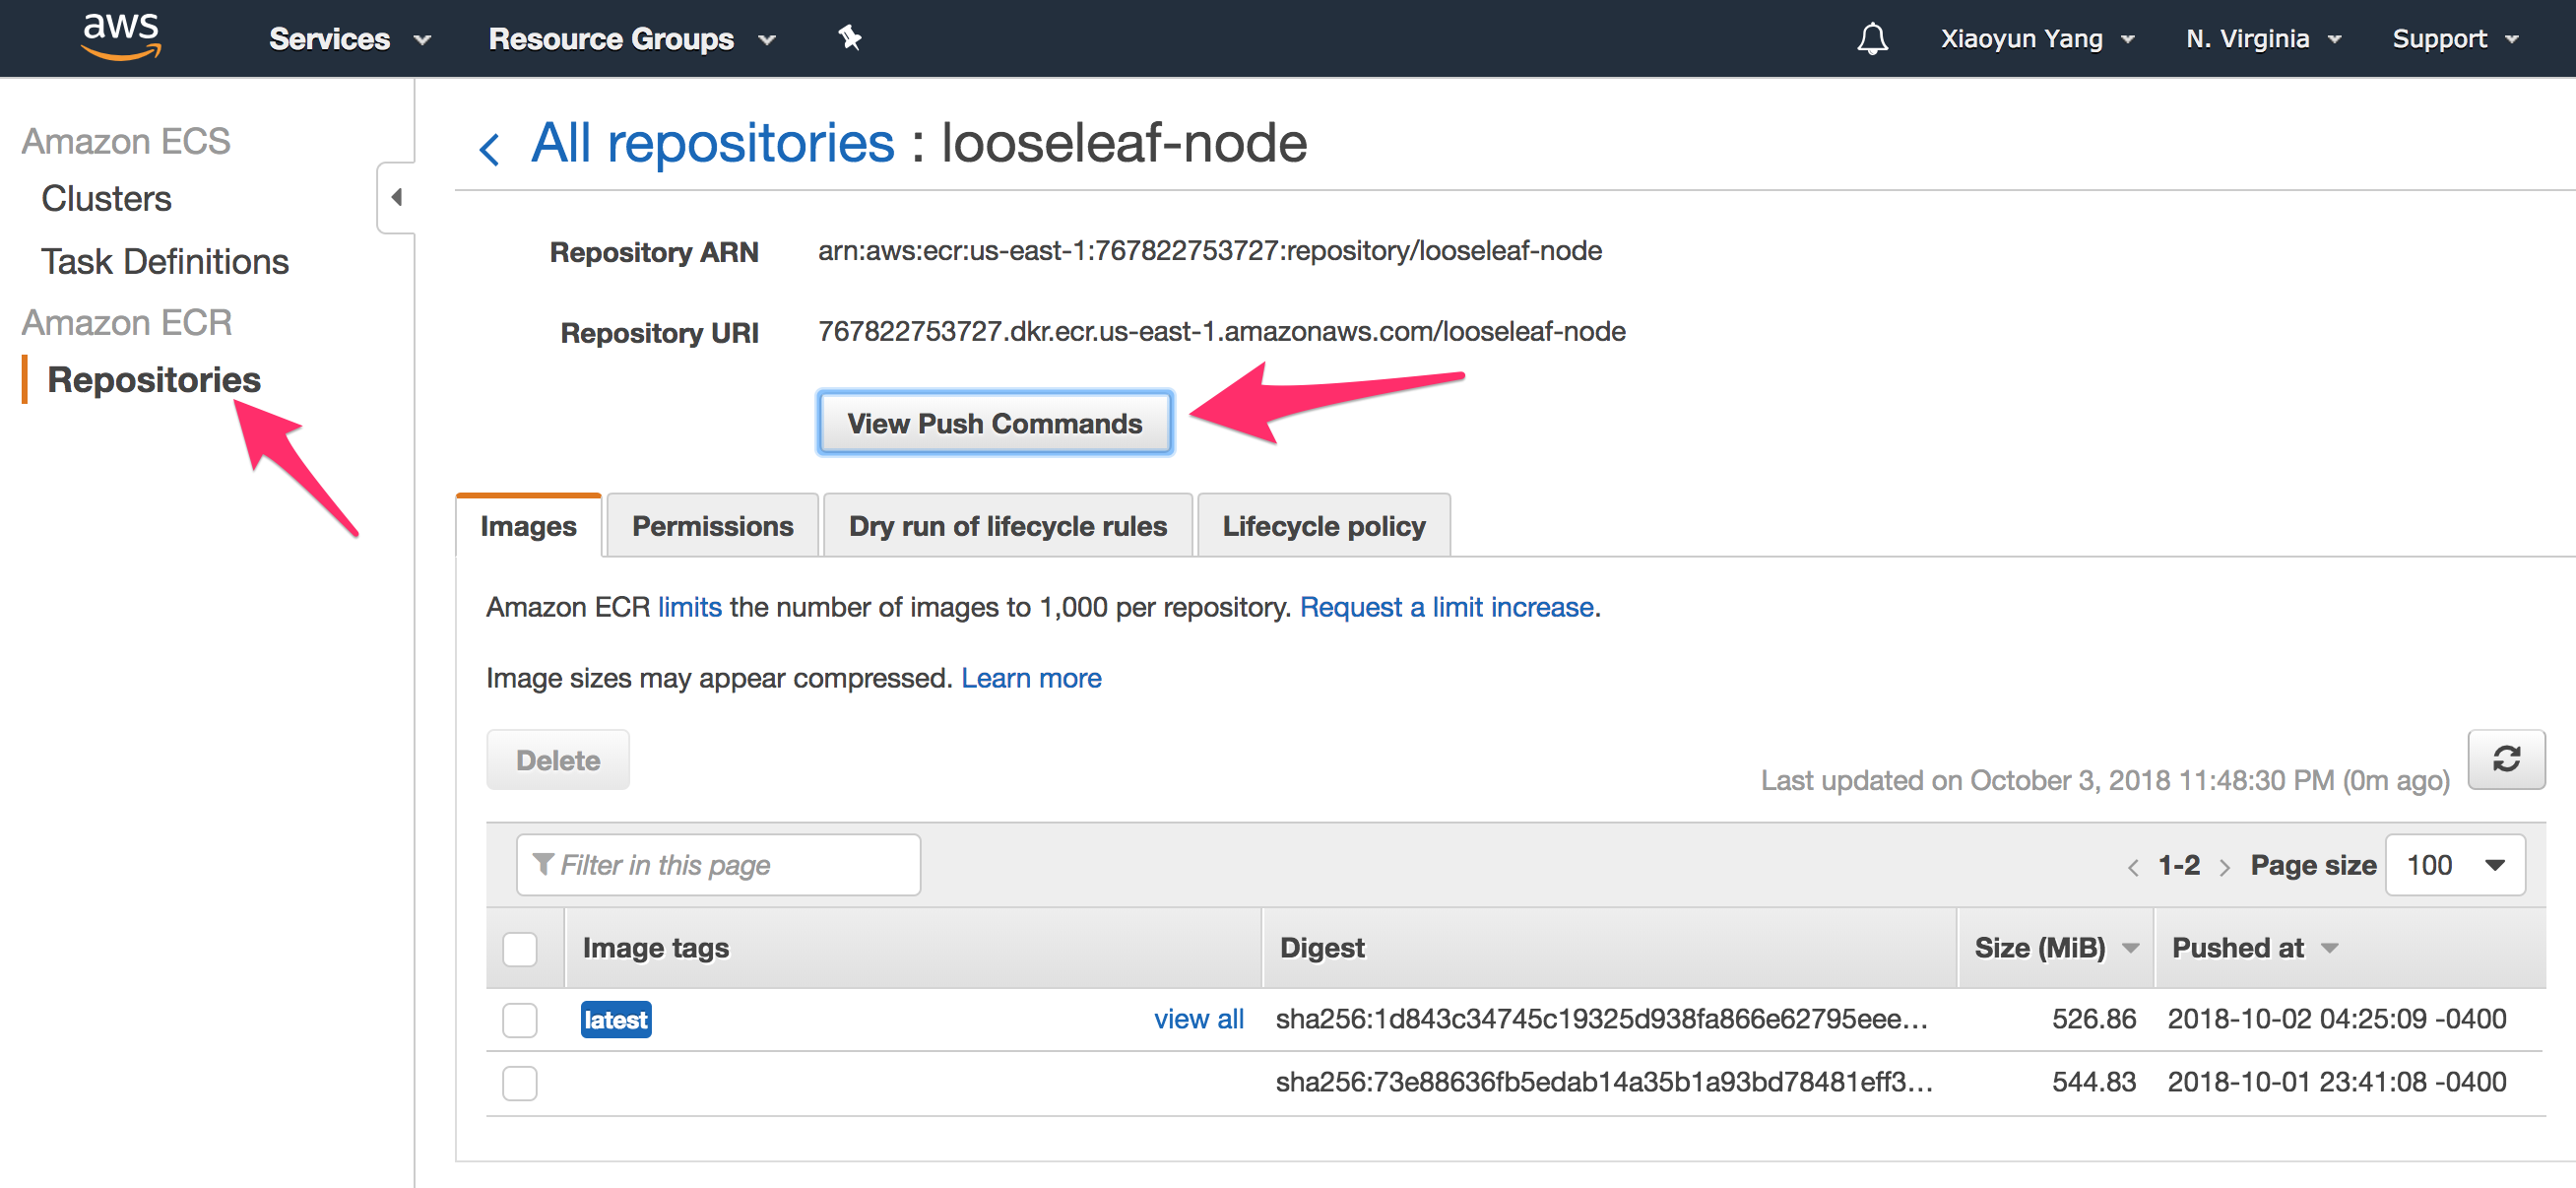
- Repository or Elastic Container Registry (ECR)
- Cluster
- Task Definition
- Service
The Repository is where you store the app image created using docker. You can push updated image of your app to the ECR using the AWS CLI. Alternatively, if you don’t want to use ECR to store your image, you could push your image to DockerHub.
A Cluster is where AWS runs containers.
Task Definition is where you tells AWS how to create your containers. Each container has is associated with an image, which is used to start your container and can be mapped to ports and volumes.
A service is essentially a collection of containers that will run on EC2 instances (ECS container instances) and auto scale according to specified rules.
Step 1: AWS CLI and SSH Keypair
It’s a good idea to be able to ssh into your EC2 instance for troubleshooting. Use the AWS CLI to create a new ssh keypair (See docs for ssh and for connecting to your container instance).
Your private key is not stored in AWS and can only be retrieved when it is created. Therefore, we are creating the MyKeyPair.pem to be stored locally.
Generally, the correct place to put your .pem file is in your .ssh folder, in your user directory. The .ssh folder is a hidden folder, to open it in finder open terminal and execute the open command.
First we need to install AWS CLI and configure it.
Then we use the AWS CLI to create keypair in the .ssh folder.
$ mkdir .ssh
$ cd .ssh
$ aws ec2 create-key-pair --key-name MyKeyPair --query 'KeyMaterial' --output text | out-file -encoding ascii -filepath MyKeyPair.pem
$ chmod 400 MyKeyPair.pem
Step 2: Create ECS Cluster, Task, and Service
You could get started with AWS ECS using the official docs. I suggest following this tutorial from Node University which walks you through (with screenshot) an actual example deploying a node app containerized with Mongo to ECS. This video walks you through how to use the Amazon ECS console to create repository, a task definition, and a cluster. This Gist provides step-by-step procedure for creating a ECS cluster, task definition and containers, as well as load balancer.
In short, we need to take the following steps:
- Create ECS Container Registry.
- Create a repository under Amazon ECS. This is where you push your docker images using the aws cli.
- Create new task definition, which includes port mapping and your two containers (node app and Mongo). See aws gist on creating a task definition.
- Create a Cluster (specify the ssh keypair you created in the previous step). I use EC2 instance type m4.large. When prompt, create a new VPC.
- Create a Service.
Amazon Virtual Private Cloud (VPC) provisions a logically isolated section of AWS where you can launch AWS resources in a virtual network that you define. When you create a cluster you should create a new VPC.
A EC2 instance is automatically created by ECS and associated with the VPC. Write the VPC ID down. You are going to need to use it a lot later when creating EFS, Security group, and load balancer.
As a side note, for all these steps, you can use Amazon’s console and AWS CLI. There’s an open source cli called coldbrew that you can download from Github which automates your Docker container deployment process. I couldn’t figure out how the configuration file suppose to look if I wanted to fire up the app container with Mongo. Also, Coldbrew seem to have a lot of “magic” that when my deployed app failed to launch, I couldn’t figure out how to troubleshoot.
Once you created the ECR and repository, use the Docker CLI to build our image:
$ docker build -t <image-name> .
Don’t forget the “dot” at the end of the command.
Then tag our built image and use the Docker CLI to push the image to our AWS ECS repository. You use two commands which you can copy-paste into your Terminal from the AWS ECS console.
For example:
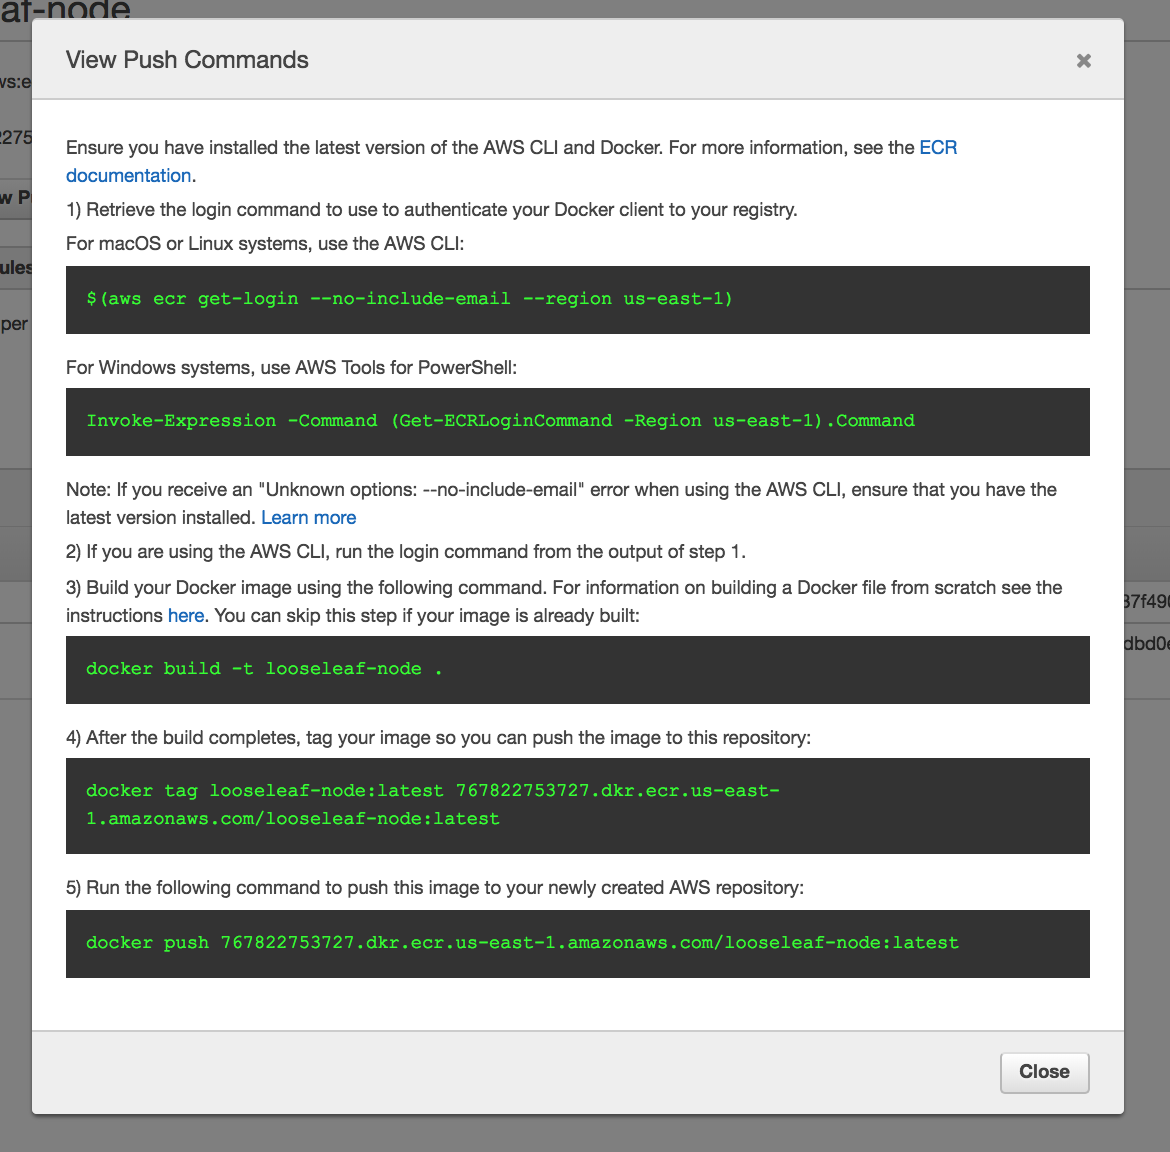
Before you push, make sure to to authenticate Docker to an Amazon ECR registry with get-login.
$ $(aws ecr get-login --no-include-email --region us-east-1)
Note, the $(command) expression is called command substitution, which is a shortcut that essentially tells bash to execute the standard output of command. If we simply execute the aws ecr get-login --no-include-email --region us-east-1 command, the stdout is docker login -u AWS -p <really really long hash string>. We’d have to copy-paste the whole string into the command line to login. Executing the $(aws ecr get-login --no-include-email --region us-east-1) command saves us from that extra step.
For our example, the complete sequence of commands for first and subsequent deploys is:
$ $(aws ecr get-login --no-include-email --region us-east-1)
$ docker build -t looseleaf-node .
$ aws ecr get-login
$ docker tag looseleaf-node:latest 767822753727.dkr.ecr.us-east-1.amazonaws.com/looseleaf-node:latest
$ docker push 767822753727.dkr.ecr.us-east-1.amazonaws.com/looseleaf-node:latest
You could put all this script in a shell script and automate the whole process of deployment.
$ touch deploy.sh
$ # put all the scripts above into deploy.sh
$ chmod +x deploy.sh
$ ./deploy.sh # run this everytime you want to deploy
To make sure the image is running in our container instance, go to the EC2 console and click on the container instance that was fired up by your ECS.
Let’s ssh into this container instance by going to the ECS console ➡️ select your instance ➡️ click connect. You’ll see a command like this:
ssh -i "MyKeyPair.pem" root@ec2-18-386-245-264.compute-1.amazonaws.com
If you try to run the above command, you’ll get an error:
Please login as the user “ec2-user” rather than the user “root”.
So we try this instead:
$ cd .ssh
$ ssh -i "MyKeyPair.pem" ec2-user@ec2-18-386-245-264.compute-1.amazonaws.com
And it should work! You can use this to connect to the EC2 instance.
You will use the following command to check if the container instance is running our docker image:
[ec2-user ~]$ docker ps
Step 3: Add SSL
The AWS Tutorial guides you through setting up your AWS Certificate Manager.
SSL/TLS certificates are used to secure network communications and establish the identity of websites over the Internet as well as resources on private networks.
SL/TLS certificates provisioned through AWS Certificate Manager are free.
The AWS Tutorial linked above is actually a little out-dated.
Here are the steps I took:
- Login to your AWS Console and click to Services ➡️ Certificate Manager.
- Get started on Provision Certificates.
- Request a Public Certificate.
- On the domain names, add your domain name (e.g.,
looseleafapp.comand*.looseleafapp.com). Click next. - Validation method: DNS.
- On the review page, click “Confirm and request” once you are satisfied.
- On the Validation page, use Amazon Route 53 to validate CNAME for you. If everything goes well, you’ll get this message:
The DNS record was written to your Route 53 hosted zone. It can take 30 minutes or longer for the changes to propagate and for AWS to validate the domain and issue the certificate.
It doesn’t take 30 minutes. I refreshed the page and Validation status changed to Success.
Next, go to the EC2 dashboard. For the container instance, click on the Security Group. Add an inbound rule with Type HTTPS and port 443.
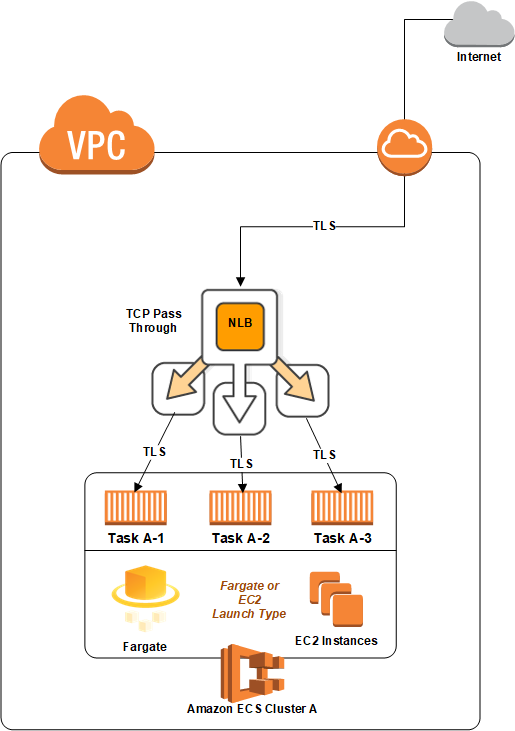
Step 4: Create Load Balancer
The Network Load Balancer is the best option for managing secure traffic as it provides support for TCP traffic pass through, without decrypting and then re-encrypting the traffic. ~AWS Compute Blog
I followed this video tutorial to create a classic load balancer.
You can also Check out the AWS official tutorial on how to create a classic Load Balancer with an HTTPS Listener.
Make sure your load balancer settings are:
- VPC ID: the VPC ID for your ECS container
- Scheme: internet-facing
- Listeners: (1) load balancer port HTTPS 443 –> instance port HTTP 80 and (2) load balancer port HTTP 80 –> instance port HTTP –> 80
- Health Check: Ping Target
HTTP:80/<filename>where<filename>is a file that your website serves from the root. For my site, it’s index.css.
Step 5: Link to Domain Name
Use AWS Route 53 to associate your container instance with a domain name.
I purchased my domain name from Google Domains. I got on chat with the customer service representative from Google Domains who walked me through how to set up route for AWS Route 53 with:
- CNAME (canonical name)
- MX (mail exchange if you use G Suite)
- NS (Name server)
- SOA (Start of authority)
After you’ve done all that, Create Record, select “Type A-IPv4 address”, select Yes for Alias, and select the load balancer from Alias Target. This gives you https://yourdomain.com and forwards http://yourdomain.com to https://yourdomain.com.
Optional: You may be able to create another Alias for www.yourdomain.com to forward to https://yourdomain.com (I don’t know how to do that yet).
Persisting Data
Following the tutorial from Node University helped me get the app up and running but there was a big problem with the setup: whenever the server goes down for whatever reason, all the data is lost.
By default, the Amazon ECS-optimized AMI ships with 30 GiB of total storage. You can modify this value at launch time to increase or decrease the available storage on your container instance. This storage is used for the operating system and for Docker images and metadata.
The docker info command also provides information about how much data space it is using, and how much data space is available.
SSH into your instance and run this command:
[ec2-user ~]$ docker info | grep "Data Space"
Output for a m4.large:
Data Space Used: 3.326GB
Data Space Total: 23.33GB
Data Space Available: 20GB
This might seem like a lot storage but this storage is ephemeral, i.e., something that is temporary in nature.
If you run your MongoDB in a container, the data is hosted in the instance’s ephemeral disk. This means the data stored in the container is gone the moment your container is deleted or restarted.
Per the AWS Blog:
Using task definitions, you can define the properties of the containers you want to run together and configure containers to store data on the underlying ECS container instance that your task is running on. Because tasks can be restarted on any ECS container instance in the cluster, you need to consider whether the data is temporary or needs to persist.
If your container needs access to the original data each time it starts, you require a file system that your containers can connect to regardless of which instance they’re running on. That’s where Elastic File System (EFS) comes in.
AWS EFS is a storage service that can be used to persist data to disk or share it among multiple containers; for example, when you are running MongoDB in a Docker container, capturing application logs, or simply using it as temporary scratch space to process data.
EFS allows you to persist data onto a durable shared file system that all of the ECS container instances in the ECS cluster can use.
EFS Primer
EFS is one of three main cloud storage solutions offered by AWS and is a relatively new service compared to S3 and EBS. Like S3, EFS grows with your storage needs. You don’t have to provision the storage up front. Like EBS, EFS can be attached to an EC2 instance but EFS can be attached to multiple EC2 instances while EBS can only be attached to one. Amazon provides a nice comparison table for the three services and a pretty good summary of the three options and what they are good for:
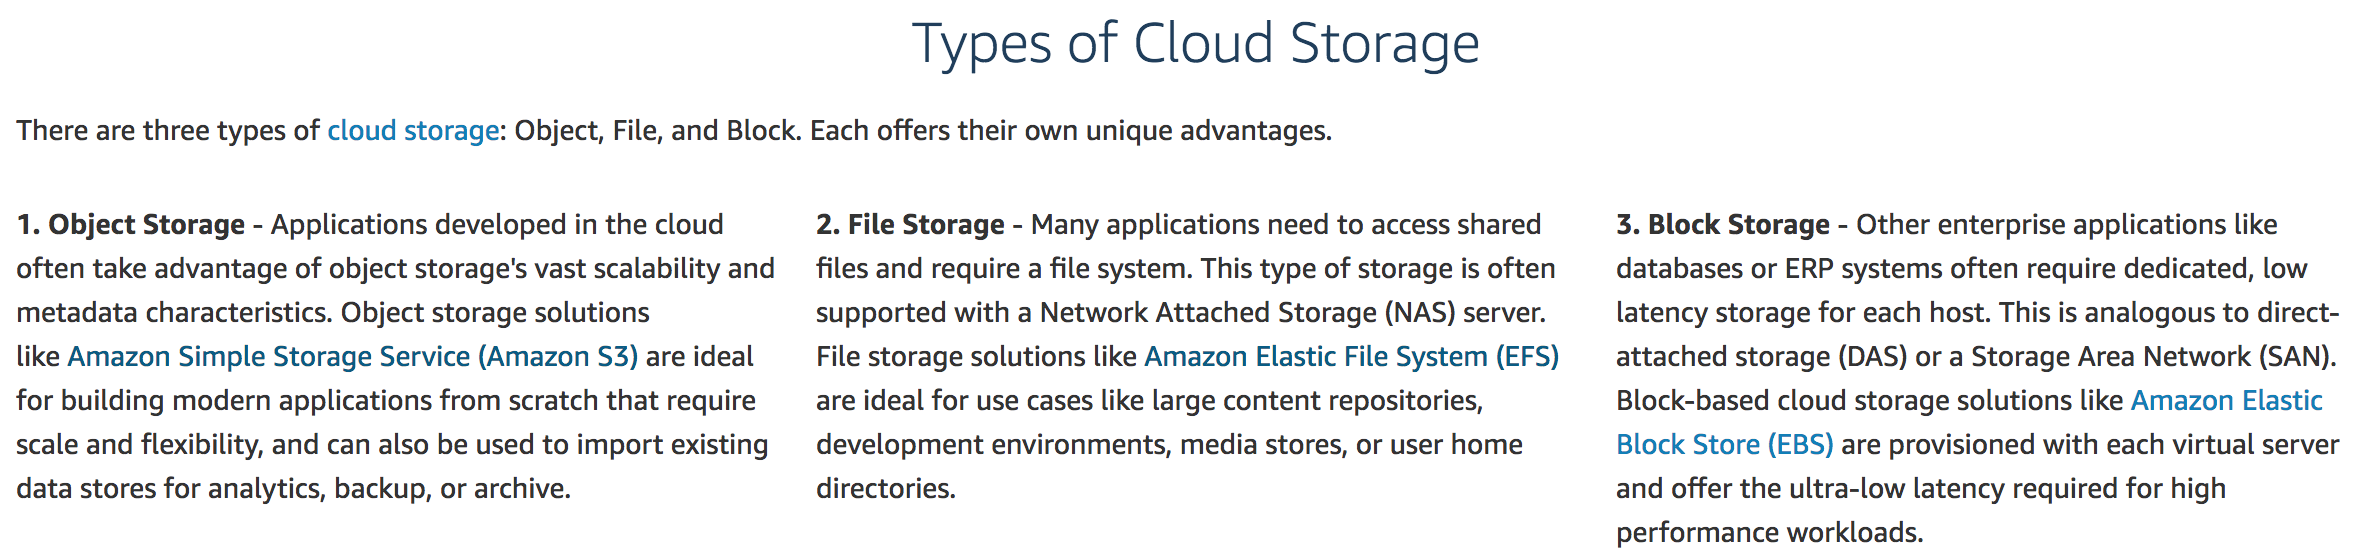
See this article for a discussion on when to use what.
In general, EFS is ideal if your web app is set up as microservices deployed to ECS in Docker containers. EFS is a fully managed file storage solution that can provide persistent shared access to data that all containers in a cluster can use. EFS is container friendly. If you need a network filesystem solution that can allow multiple EC2 instances to access the same data at the same time, use EFS.
What we want to do is to have containers that gets access to the original data each time it starts. The original data comes from EFS.
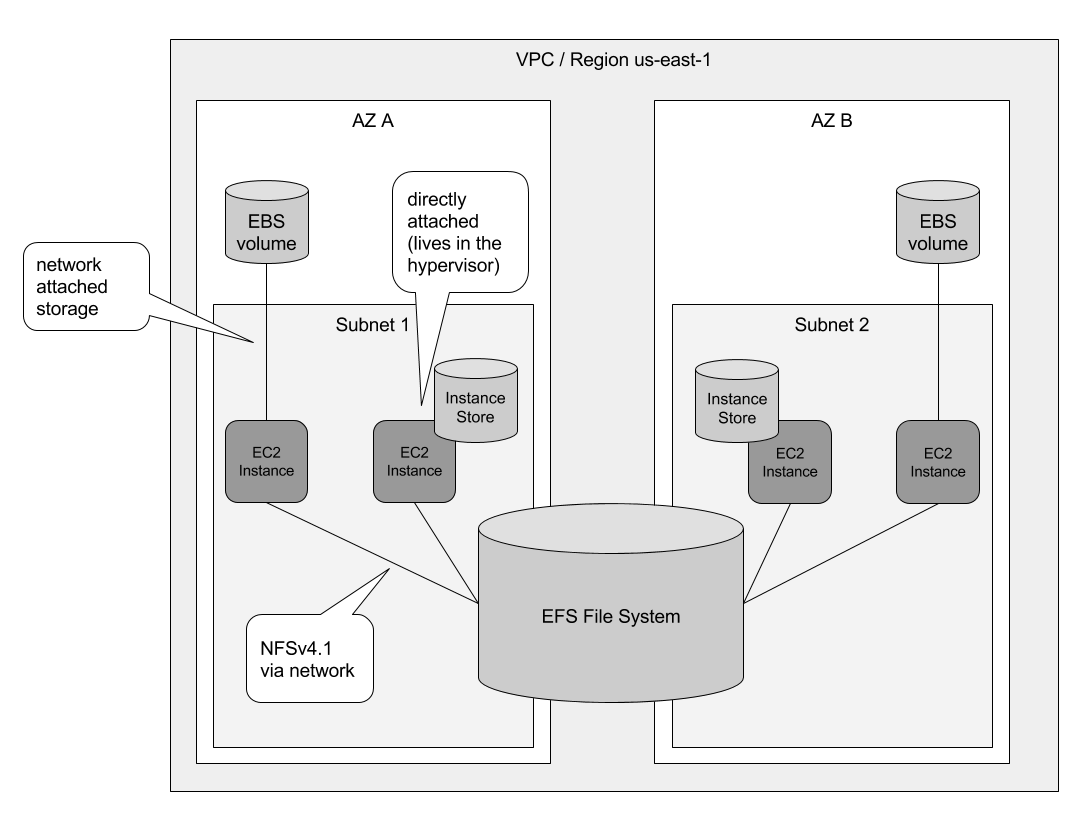
Image source: cloudonaut, originally from Amazon Web Services in Action, Second Edition.
It’s worth noting some important constraints of EFS:
- Only available for Linux EC2. Fargate or Windows EC2 not supported.
- The EC2 Instance must be in the same subnet as the EFS Mount Target.
Set Up EFS With Your Containers
This Gist provides step-by-step tutorial to set up AWS ECS with EFS. Note, there’s an error in the gist’s tutorial in the task volume mapping. See below for the correct mapping.
Other useful resources I found include:
- Official tutorial from Amazon
- Atomic Object tutorial
- Knowledge India Video
- Cloudonaut article
- Veritas Tutorial (with pictures)
Basically, I followed the gist in combination with this aws Compute blog post and this AWS official doc for ECS+EFS to:
- Create a KMS Encryption Key.
- Create a security group for the EFS filesystem that allows 2049 inbound with the source being the EC2’s security group.
 Name the security group EFS-access-for-sg-dc025fa2. Replace “sg-dc025fa2” with the security group id of your EC2 instance.
 - Create a new EFS filesystem.
- Enable encryption
- Use the VPC ID of your ECS cluster.
- Use the security group ID created in the previous step for the mount target security group.
- update ECS cluster’s CloudFormation template per the gist instruction.
- Updated the Task Definition:
- Create the mapping to the volume mapping:
- volume name:
efs - source path:
/efs/<yourDatabase>
- volume name:
- Update the mongo container’s mount point to include:
- container path:
/data/db - source volume:
efs
- container path:
- The two volume mapping is needed because we want the container to access the file system is mounted on the host instance in.
- Create the mapping to the volume mapping:
- Update service in ECS to use the updated Task Definition.
- Scale instances down to 0, then to 1 again. This terminates the existing EC2 instance and then spins up a new EC2 instance using the new Task Definition and CloudFormation script. EFS mounting should be automatically done by the start script in CloudFormation. The Task Definition volumes mapping ensures the EFS mount target is hooked up to the mongo container.
- Verify EFS is properly mounted
Before you try to restarting your instance and run the automated script in the CloudFormation template, it’s a good idea to try to ssh into your instance and do make sure you can do everything manually. See the gotcha section for more on that.
After you restarts the EC2 instance with the updated task definition, ssh into the instance and make sure the file system volume is mounted and is mapped to the mongo container volume:
Run the following command. If you see a similar output on the last line, that’s a good sign.
[ec2-user ~]$ cat /etc/fstab
#
LABEL=/     /           ext4    defaults,noatime  1   1
tmpfs       /dev/shm    tmpfs   defaults        0   0
devpts      /dev/pts    devpts  gid=5,mode=620  0   0
sysfs       /sys        sysfs   defaults        0   0
proc        /proc       proc    defaults        0   0
<EfsUri>:/ /efs nfs4 nfsvers=4.1,rsize=1048576,wsize=1048576,hard,timeo=600,retrans=2 0 0
Then run this command:
[ec2-user ~]$ cd /efs/<yourDatabase> && ls
The output of the above of the above command should be a bunch of .wt files and some other mongo files.
Next, verify that the volume is mapped correctly to the mongo container’s volume:
[ec2-user ~]$ docker ps
[ec2-user ~]$ docker exec -it <containerID> /bin/bash
root@mongo:/$ cd data/db
root@mongo:/data/db$ ls
The output should be the same files you see in the /efs/<yourDatabase> directory.
Try writing to the directory:
root@mongo:/data/db$ echo 'hello' >> test
root@mongo:/data/db$ cat test
hello
root@mongo:/data/db$ exit
[ec2-user ~]$ cd /efs/<yourDatabase> && cat test
hello
This proves that the two volumes are syncing.
To verify the mount status of the Amazon EFS File System on host volume:
[ec2-user ~]$ df -T
Filesystem     Type              1K-blocks    Used          Available Use% Mounted on
/dev/xvda1     ext4                8123812 1949800            6073764  25% /
devtmpfs       devtmpfs            4078468      56            4078412   1% /dev
tmpfs          tmpfs               4089312       0            4089312   0% /dev/shm
efs-dns        nfs4       9007199254740992       0   9007199254740992   0% /efs
Where efs-dns has the following form:
file-system-id.efs.aws-region.amazonaws.com:/
If you see efs-dns in the output, that shows the file system is properly mounted.
Alternatively, you can check mount status using the following commands:
[ec2-user ~]$ df -h | egrep '^Filesystem|efs’
[ec2-user ~]$ mount | grep efs
Update Your App
To update your application, you may have to update the task definition and then update
How to update ECS container to update service task to reflect latest image in ECR:
AWS recommends registering a new task definition and updating the service to use the new task definition. The easiest way to do this is to:
- Use the deploy script discussed earlier in this guide to deploy an updated image to the ECR
- Navigate to Task Definitions, select the latest task, choose create new revision
- Update Service to use the latest task revision.
- Scale up your cluster to 2*n instances. You will see that a new running task is created to use the latest revision.
- Wait for new the service to be restarted
- Scale down your cluster to n instances.
If you need to change your instance type:
- Go to CloudFormation. click on the Stack corresponding to your ECS-Cluster.
- Click “Update Stack”
- Use current template, Next
- Change
EcsInstanceTypeto your preferred instance type - Next, Next, Update
- Scale up your cluster to 2*n instances
- Wait for the n new instances of the new type being created
- Scale down your cluster to n
Gotchas
ECS Container DB Not Persisting
Based on AWS’s Docs on using Amazon EFS File Systems with Amazon ECS, we need to configure a running container instance to use an Amazon EFS file system:
- Log in to the container instance via SSH.
- Go to AWS console ➡️ EFS. Click on the file system. There’s a link on the page that reads “Amazon EC2 mount instructions”. Click on that link, then execute the commands listed.
Validate that the file system is mounted correctly with the following command.
$ mount | grep efs
Note, if you make a mistake, use unmount as follows
$ umount /efs
You can verify that your Amazon EFS file system has been unmounted by running the df command to display the disk usage statistics for the file systems currently mounted on your Linux-based Amazon EC2 instance.
$ df -T
Make a backup of the /etc/fstab file.
$ sudo cp /etc/fstab /etc/fstab.bak
Update the /etc/fstab file to automatically mount the file system at boot. Replace fs-613c8628.efs.us-east-1.amazonaws.com with your actual file system DNS name.
$ echo 'fs-613c8628.efs.us-east-1.amazonaws.com:/ /efs nfs4 nfsvers=4.1,rsize=1048576,wsize=1048576,hard,timeo=600,retrans=2 0 0' | sudo tee -a /etc/fstab
Reload the file system table to verify that your mounts are working properly.
$ sudo mount -a
After mounting the file system on the host container instance, we want to create a Task definition to use the Amazon EFS file system. Let’s create a volume mount in our ECS task definition that allows our containers to access the file system.
Allow the ECS container instances to connect to the EFS file system via mount targets in your VPC.
EFS can result in significantly degraded performance
Workloads where many small files are written in a serialized manner, like git, are not well-suited for EFS. EBS with an NFS server on top will perform much better.
Unable to mount EFS on ECS instance
Symptom: running the mount commands hangs, times out, and display the following error:
mount.nfs4: Connection reset by peer
Failed to initialize TLS tunnel
Root Causes:
- Security group is not set up correctly.
Remedy:
According to this thread on AWS forum, the problem may lie with the configuration of the mount target’s security group. Use this guide for more on how to create security groups so you can use Secure Shell (SSH) to connect to any instances that have mounted Amazon EFS file systems. This tutorial walks you through how to create a security group for your EFS File System.
What we want is to have two security groups, one for your EC2 instance and another for your EFS file system that connects to your EC2 instance.
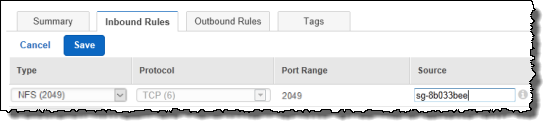
For your EFS security group inbound rules, make sure you have this rule:
Where sg-8b033bee in the “Source” field of the image above should be the actual security group ID of your EC2 instance.
Make sure both security group’s VPC IDs are identical and equal to the VPC ID created when you first created the ECS cluster.
Unable to SSH into EC2 instance.
For your EC2 security group inbound rules, make sure you have this rule:

As an added security measure, it’s a good idea to specify the IP address when you open up port 22 for inbound communications (under inbound rules settings). If you are taking this approach, make sure to whitelist all the IP addresses from all the location where you work (e.g. your office, home, co-working space) as the IP address will be different. Otherwise, the ssh attempt will hang and time out.
Image Proliferation
- Every time you run
docker-compose up, you are building a new image. These images could be more than a gigabyte in size. I wasn’t aware that these images are being built and retained after Ictrl+cfrom the docker process. Quickly my hard drive was running low on memory. Make sure you delete outdated images with the following lines of commands:
List containers:
$ docker ps -a
Remove containers by id:
$ docker rm <CONTAINER ID>
List images:
$ docker images
Remove images:
$ docker rmi <IMAGE ID>
Make sure to run docker rm to delete the containers before removing the images. Otherwise, you’ll get this error:
Error response from daemon: conflict: unable to delete 3d2765b2fe31 (must be forced) - image is being used by stopped container 5ee892b7f037
AWS Elastic Beanstalk
Don’t use it. Use AWS ECS instead.
Mongo Atlas
Don’t use it. Mongo Atlas free tier can’t execute certain commands like find. Costs too much money 😞
Their tutorial (part 1, part 2) is pretty good though.
Using Mongo Shell Via Container
$ docker run -it -d mongo
592a2dfdcffd8a2c59615800eace1e922ba5e88bb836eaf11c06e06278112ed9

$ docker ps

CONTAINER ID        IMAGE                        COMMAND                  CREATED             STATUS              PORTS                            NAMES
592a2dfdcffd        mongo                        "docker-entrypoint.s…"   8 seconds ago       Up 7 seconds        27017/tcp                        cranky_chebyshev

$ docker exec -it cranky_chebyshev bash
root@592a2dfdcffd:/#
# docker stop cranky_chebyshev
# docker rm cranky_chebyshev
Useful Commands
See which process is running in port 3000, then kill that process.
$ lsof -i tcp:3000
$ kill <PID>
Kill all mongo servers
$ lsof -i | grep mongo
~$ lsof -i | grep mongo
mongod    19557 xiaoyun   10u  IPv4 0x6b9c9aebc1dd3e63      0t0  TCP localhost:27017 (LISTEN)
mongod    19557 xiaoyun   32u  IPv4 0x6b9c9aebdea763e3      0t0  TCP localhost:27017->localhost:56383 (ESTABLISHED)
mongod    19557 xiaoyun   34u  IPv4 0x6b9c9aebe1fafe63      0t0  TCP localhost:27017->localhost:56370 (ESTABLISHED)
mongod    19557 xiaoyun   35u  IPv4 0x6b9c9aebadd5c3e3      0t0  TCP localhost:27017->localhost:56385 (ESTABLISHED)
mongod    19557 xiaoyun   37u  IPv4 0x6b9c9aebe97b1123      0t0  TCP localhost:27017->localhost:56389 (ESTABLISHED)
mongo     19569 xiaoyun    7u  IPv4 0x6b9c9aebdde83e63      0t0  TCP localhost:56370->localhost:27017 (ESTABLISHED)
$ kill 19557
you could also use the following command to see that EBS drive is provisioned with the EC2 instance.
[ec2-user ~]$ df -h
You can use the following command to check the AWS EBS volume’s listing on the instance:
[ec2-user ~]$ lsblk
